
Spending weeks relying on a Colman LP camp stove for cooking led me to look for a better solution. Our Colman stove was great when you needed a hot burner, however, it was not possible to adjust the burners low enough to simmer. I tend to cook meals similar to what I cook at home so a good stove is essential. I am tired of the stove dictating what I can cook.
Time to step up to a gourmet camp stop. Enter the Brunton Wind River Range. This stove is considered the Cadillac of camp cook stoves with controls and function like a home range.
With the new stove in hand I decided this would be a good time to do a full tear down review. By totally disassembling the stove I am able to discuss the construction as well as take large number of photos so others can see the quality.

The Stove Ready To Go

Stove setup and ready to cook
The stove is constructed of extruded and stamped aluminum parts which are bolted together using stainless steel screws. Tearing the stove down took me all of 10 minutes. This would lead to easy replacement of damaged parts.
Burner construction

Aluminum Valve Mount
The burner valve assembly is made from brass with a polymer knob and is mounted to an aluminum extruded member.

Tank Hose Attachment
The attachment for the hose is again constructed of brass and is mounted so when the hose is tightened the tubing connecting to the burner valves are not stressed.

Mounted Valve Assembly

Brass Valve Jet

Steel Burner Mounting Plate
The burners are mounted to a sturdy steel plate with a spring between the burner and the steel plate. This spring allows the burner tube to move when the burner assembly is installed in the stove.

The burner tube appears to be constructed of stainless steel

- Burner assembly is installed in the stove the burner tubes line up right in front of the valve jets
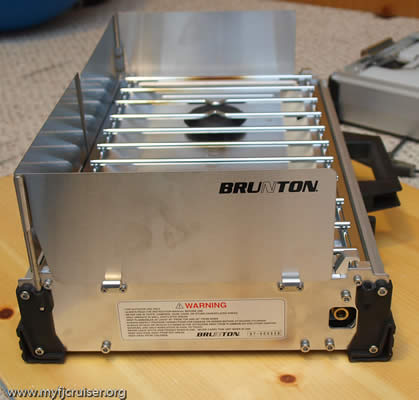
Stove Body Construction

End view of the Extruded Front Member

Front with valve assembly attached
The front and back members of the case are constructed of durable extruded aluminum with the sides being constructed of thick stamped and formed aluminium.

Stamped Aluminum Side Member

Hing Mounted on side plate

- Aluminum insert for both bottom and top
The bottom and top have a filler that is a sheet of aluminum. The edges of this sheet have stamps in them which provide a tighter fit.

Front and Back with bottom in place

End plate in place

Corner part
The corners of both the top and bottom are made of a durable polymer piece that is fitted to the corners and bolted on.

Close up of Front corner

Closeup of back Corner

Top view of grill mount

Side View of Grill Mount

Stove with Grill in place
The grill is VERY heavy duty and is attached to the stove with four tabs that it firmly fits under. To remove the grill it must be lifted then slid forward. No need to worry about the grill moving during use and it will support the heaviest pots you will want to use.

Wind Screens

Front view with wind screens installed
Side view of wind screens
The wind screens are made of stainless steel and attach to the stove in such a way that very little wind will be able to enter the stove from the sides or back. The wind screens do not have to be used if there is no wind. They store in the cordura pouch that comes with the stove.

Hose and Wind Guards stowed under burner plate.
The hose also fits in the cordura pouch to protect the regulator and fittings. There is a small adapter that can be used if you want to run the stove of the small green camp fuel bottles. I imagine that if you use these small bottles you will be able to empty one during a single use of the stove.

Storage space in Case Cover
There is LOTS of storage space in the top of the stove. This can be used for cooking utensils as well as other stuff. I keep my griddle stowed here. Brunton makes a sink that kits in this space.

My Griddle stored in top of case

Cutting Board in place
The stove comes with a heavy duty cutting board that is stowed in the top using two latches. The board will hold any items stored underneath in place when opening the stove up.

Close up of latch

Case Latches Engaged
The stove is closed with two heavy duty latches which should hold up to years of abuse.
I am looking forward to our first trip where I will be able to put the stove through its paces. Look for follow up post on the stoves performance.
20 comments for “Brunton Wind River Range – Camp Stove – Tear Down Review”